
Images
Now let's look at another important part of web pages: images. In the previous lesson, we met the br element, which has only an opening tag. Elements like this, with no content and no closing tag, are called void elements, and an image is another one. We create an image like this:
<img src="image-address">The img element (img stands for image) has the src attribute (source), whose value is the address of the image. Just like with links (the a element), we can use both absolute and relative addresses.
Like br, we write img without a slash. You may also come across <img src="image-address" />: that is an older way of writing the same thing.
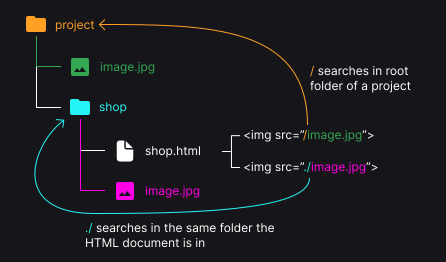
We said that in the address ./dog.html, the ./ means "in the current folder": the browser looks for dog.html in the folder of the HTML file with the link.
A relative address can also start with just a slash, for example /dog.html. Then the browser looks for dog.html in the root folder of the project, the folder that contains all the others.
Our image has the address /learn/html/cats.webp: it is in the root folder of startcoder.com, in the folder learn and its subfolder html. (.webp is an image format, like .jpg or .png.)
Instructions
Start programming for free
5/12